Table of Contents
- type:
- gateway
- name:
- ComGate
- countrie:
- CZ, SK, PL
- support-added:
- 2.0.0
- auth-net-emulation:
- no
- supports-3dsecure:
- yes
- gateway:
- https://www.comgate.cz
ComGate
Setting Up ComGate for FoxyCart
You'll need to reach out to ComGate support to organise a new account with their team.
Subscriptions are not supported with ComGate at this time. If you intend to sell subscriptions with your FoxyCart store, you will also need to make use of another payment gateway that does.
Configuring a Test Account
Once you have an account from ComGate, it will by default just be in test mode - so it can be used for testing with your FoxyCart account. To connect it to your store, you'll need to get a few values:
- Log in to the ComGate Client Portal, and click on your store under “Eshops Settings” in the left hand navigation.

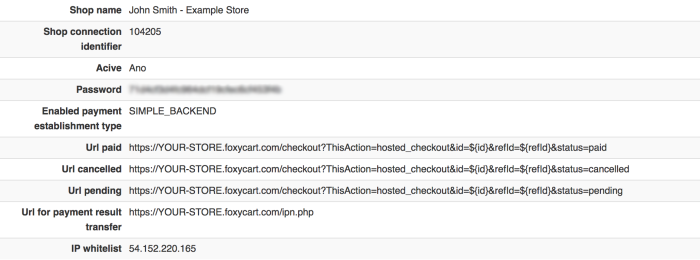
- Click on the “Shop connections” tab. For new accounts there may be a default shop connection already present. If so, and you're not using it for another store, click to edit that entry. Otherwise click the “Add” button to add a new shop connection
- On the form, it will be pre-filled with some default values - you'll need to customise some of them. For each of the “Url” settings below, you need to replace
YOUR-STORE.foxycart.comwith your own FoxyCart store domain:- Password: You can leave this as the pre-filled value, or customise it with a secure value
- Enabled payment establishment type: HTTP POST protokol - backend
- Notifications for customers: You can leave this off as FoxyCart will send an email receipt if configured in your “email” settings
- Url paid:
https://YOUR-STORE.foxycart.com/checkout?ThisAction=hosted_checkout&id=${id}&refId=${refId}&status=paid - Url cancelled:
https://YOUR-STORE.foxycart.com/checkout?ThisAction=hosted_checkout&id=${id}&refId=${refId}&status=cancelled - Url pending:
https://YOUR-STORE.foxycart.com/checkout?ThisAction=hosted_checkout&id=${id}&refId=${refId}&status=pending - Url for payment result transfer:
https://YOUR-STORE.foxycart.com/ipn.php - IP whitelist:
54.243.60.354.152.220.165
- Save the settings
- After saving - you'll be returned back to the “Shop connections” list. Click the view button (the small eye) on the connection you just edited or created.
- On the view screen - reference the “Shop connection identifier” and the “Password” values. Copy these values into the test server ComGate settings on the “Payments” page of the FoxyCart administration.
- You will also need to ensure that your FoxyCart store's currency (as set on the “settings” page in the FoxyCart administration) matches the currency of your ComGate account - which will probably be CZH.

At this point - you're connected your ComGate account into your FoxyCart store as a test payment gateway.
Placing Test Transactions
With the test shop connection details entered - you should be able to select ComGate as a payment method on your store's checkout. For details on running test transactions, review ComGate's testing documentation here.
Going Live With ComGate
When you've completed testing and you're ready to go live - you'll need to reach out to ComGate's support team to request that your account be moved into production mode. They'll confirm that your account is all configured correctly for their requirements.
You can also set up a new Shop Connection to use as the Live Server settings for ComGate on your store's FoxyCart administration. Follow the instructions noted above within “Configuring a Test Account” section for the steps on creating a shop connection.
Troubleshooting & Interpreting Response Codes
Contact ComGate for info. Know more? Feel free to edit this page with info.
Important Notes and Caveats
- Transaction amounts need to be at least 10 CZK to be processed with ComGate
Possible Action: Datafeed Handling
At the time of the customer completing the transaction - we don't necessarily know whether the transaction was completed yet or not. We instead rely on a notification from the gateway after the checkout has been completed to confirm whether the transaction was approved or not. To handle this, transactions are initially marked as pending, and when we get a confirmation from the gateway on the result of the transaction, we update it accordingly. Each time the status changes, a datafeed will be sent to your endpoint if configured with the transaction details and the status node will be present.
The status node can contain one of three different values: pending, approved or rejected. Depending on the types of actions you're needing to perform at your datafeed endpoint, you need to make sure the appropriate status value is present first.
User Notes and Experiences
If you have tips, experience, or helpful notes related to this gateway that would benefit others, please add them below, including your name and the date. We reserve the right to edit or remove comments that don't add value to this page.
