Table of Contents
Creating a FoxyCart account
Start at https://admin.foxycart.com/admin.php?ThisAction=SignUp Enter your first name, last name, the email address where you would like us to contact you, and a password (twice). Select one or more options from given check-boxes (developer, designer, merchant), read the terms and conditions (we tried to keep them short!), click the check-box to accept terms & conditions and click “SignUp”.
Basic settings
In six short steps you’ll be up and running. Before you can begin using your new FoxyCart account, you must first create a store (which will be your Step-1. You can skip the rest of steps/wizard for later configuration).
Step 1 - Setup your store
Here you will be asked to fill in the following options (see the screenshot below):

- Store Name: Enter the name of your company or store as you would like it to appear on foxy cart pages. This is a required field.
- Store URL: The URI of your current site (i.e. http://example.com). This will be used for referrer checks, continue shopping buttons, and to advertise your store. This is a required field.
- Logo URL: The URI of your company logo. This should be an image and will be used in your receipt emails. This is a required field.
- Store Subdomain: This will be your custom subdomain at foxycart.com. For example: if you setup mystore as your domain, your full store domain would be at mystore.foxycart.com. (You need only enter the subdomain, not the full domain. e.g., “For mystore.foxycart.com,” enter only “mystore”). This is a required field.
- Use Custom SSL: If you would like to use your own subdomain (like store.yourdomain.com), please carefully read and complete the custom subdomain order form. IMPORTANT: This option requires a separate security certificate, as well as some additional effort on our part. Though included in the advanced pricing tier, for the standard plan it costs an additional $100/year and is only available when paying annually.
- Multiship ship-to Addresses: If you would like your customers to have the ability to specify specific ship-to's with each cart add (think Christmas shopping), add multiship to your store features.
- Store Email: This email address will be used for billing and receipts for your store. This is a required field.
- From Email: This email address will be used as the from address when sending receipts to your customers (otherwise the first email listed in the store email will be used).
- Store Postal Code: This is the Zip Code or Postal Code of your store used to accurately calculate shipping costs for your customers. This is a required field.
- Store State/Province: This is the State or Province your store is located in. Used to determine applicable tax rates. This is a required field.
- Store Country: This is the Country your store is located in used to determine applicable shipping rates. This is a required field.
After filling in all of these fields, just click “setup your store” to create your store. You will be taken to the second step.
Step 2 - Save your default category
You can use “categories” to set default values for your products. Explore the options below and save your default category.
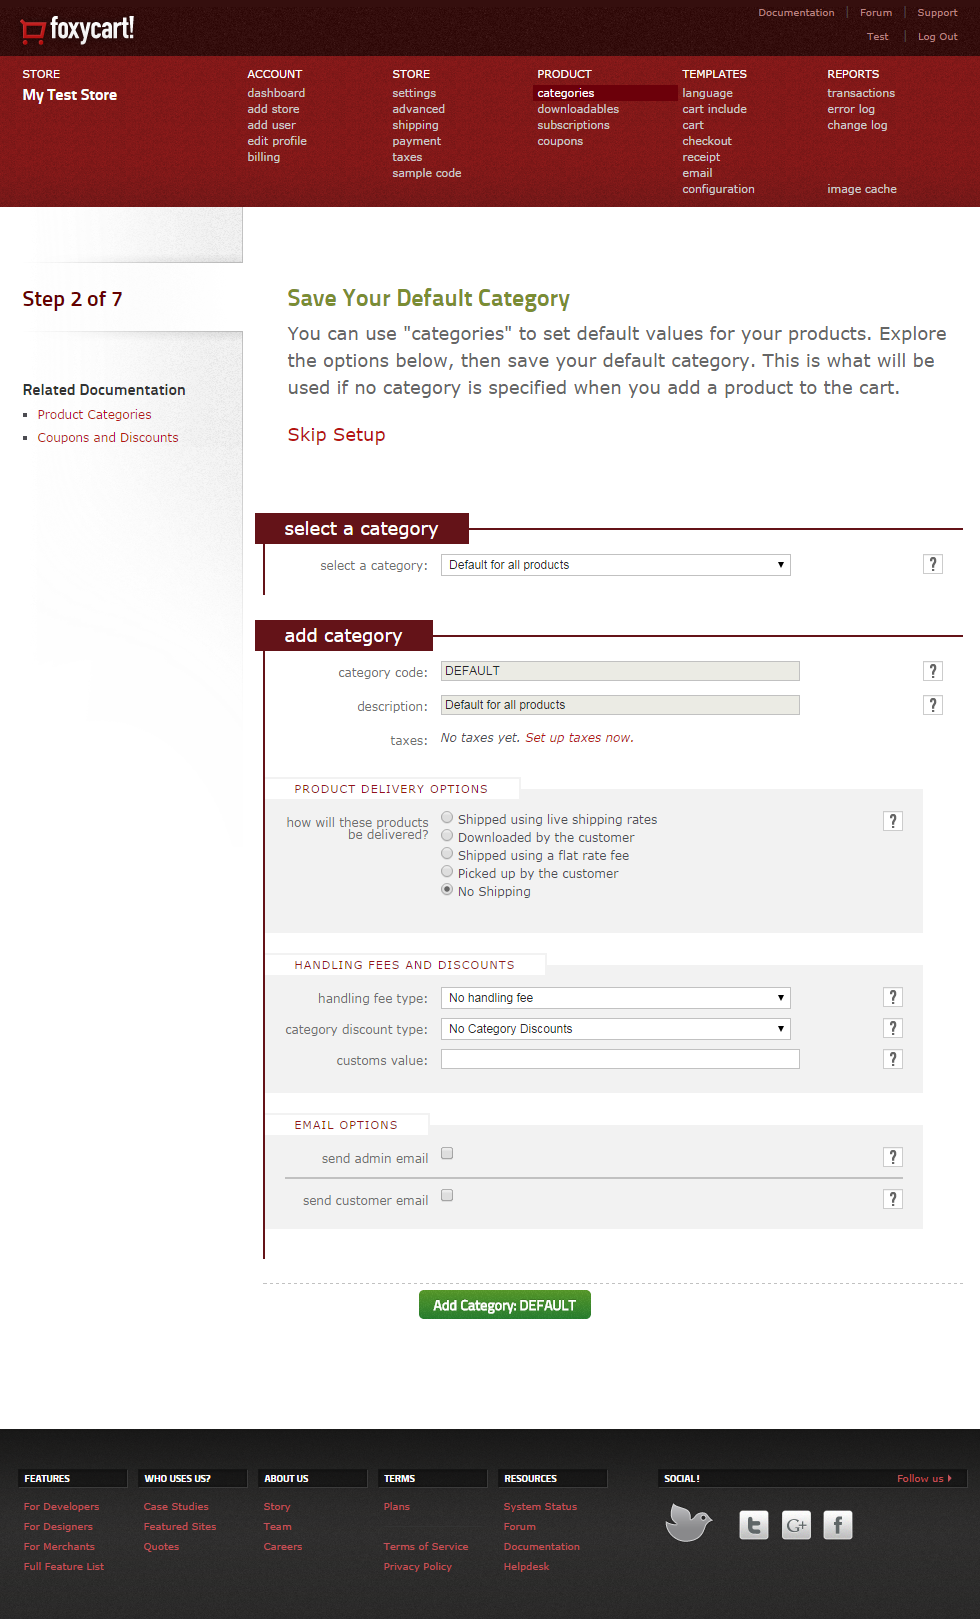
- Select a category: First product category will be the default category. The “DEFAULT” product category will be used for all products sent to the cart that do not have a specified category.
- Description: Enter a descriptive name for this category that will help you determine what products should be included in it.
- Category code: This is the actual code sent as a “category” to the shopping cart.
- Product delivery options: Select the option that best reflects how products in this category will be delivered to the customer.
- Handling fee type: This determines what type of Handling Fee you would like to use.
- Category discount type: This determines what type of per category discount you would like to use, if any.
- Customs value: Enter a dollar amount here for the declared customs value for international shipments. If you leave this blank, the sale price of the item will be used.
- Send admin email: By checking this box, a category-specific email will be sent to an administrator you specify every time a product in this category is sold.
- Send customer email: By checking this box, a category-specific email beyond the standard receipt will be sent to customers who purchase products in this category.
After filling in fields, click “add category: Default” to create your default product category. If you don’t want to enable shipping options and your products aren’t download-able products, just select the option of “no shipping” and click on “add category:Default”. Your default category is configured. You will be then taken to the third step.
Step 3 - Select and configure your Payment Gateway
This is where you'll set up your payment gateway. If you don't have a gateway, or don't know the info, just set this to one of the test servers and save it with our default info. (We recommend selecting Authorize.net, as it’s generally a very fast and easy to use test gateway.) You can come back to it later.
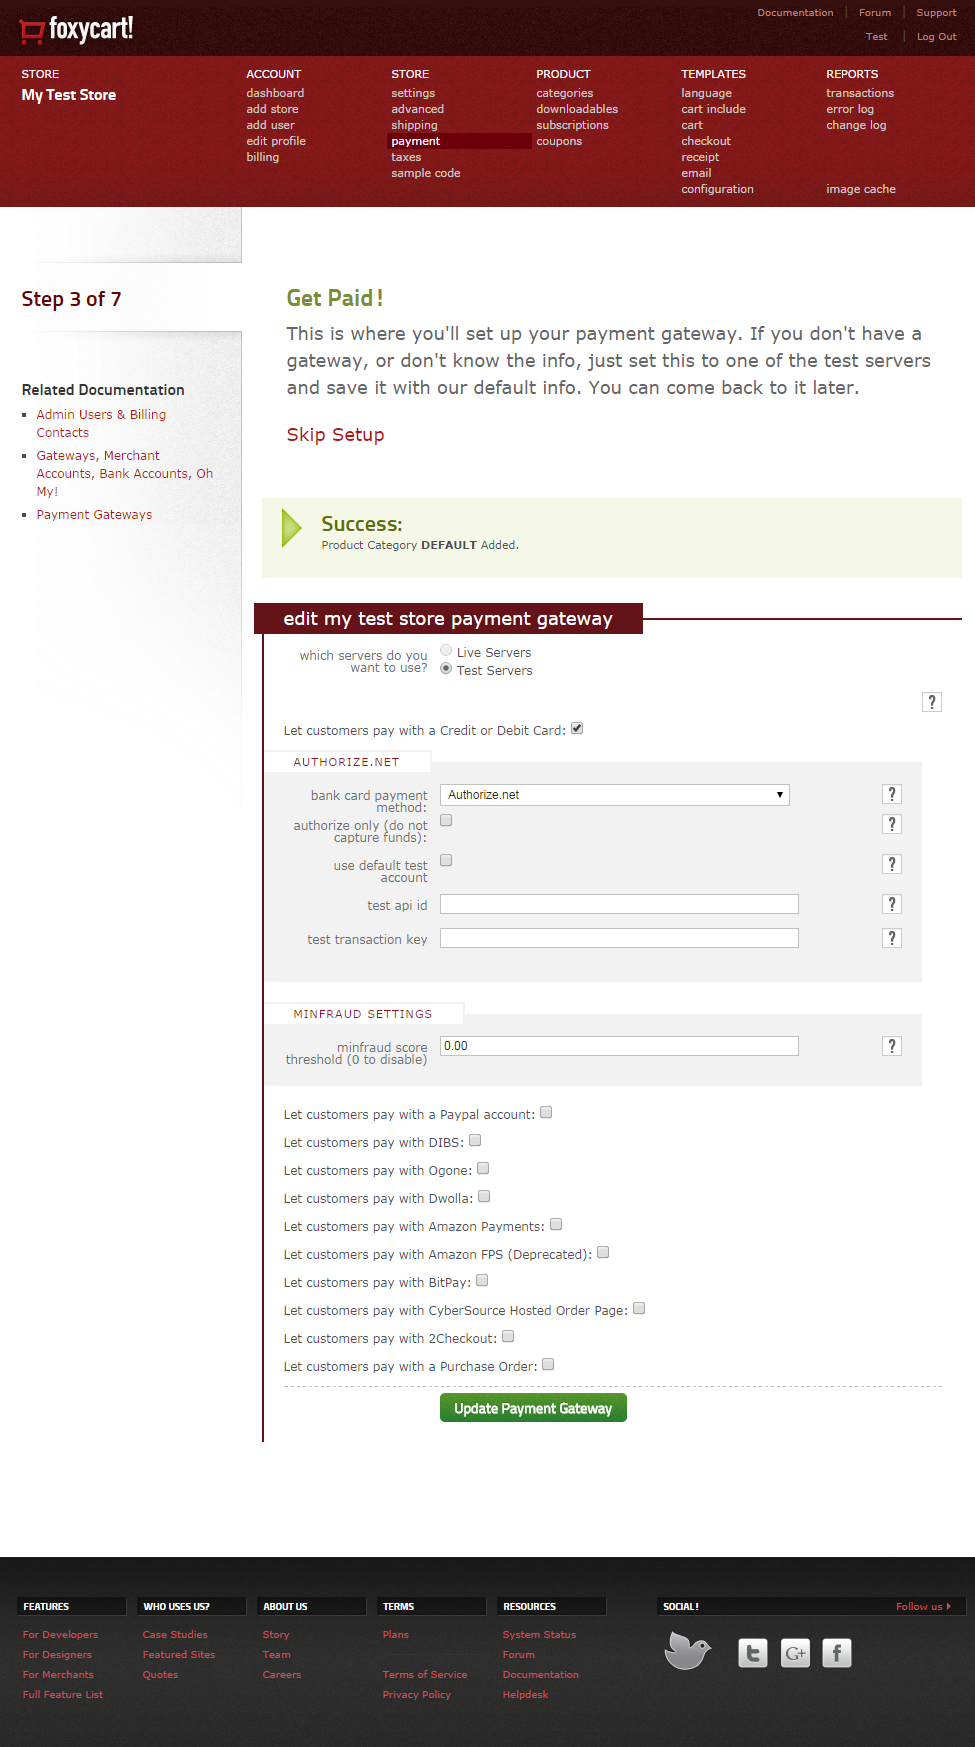
In order to use a live payment gateway or purchase orders you must setup your FoxyCart subscription. You can select a plan and start subscription by clicking on “Start My FoxyCart Subscription” button. You can cancel at any time by using the links in your email receipt or by emailing us at helpdesk+billing@foxycart.com. But for now, you can set to “Test Servers”. Again, you do not have to pay at this time. Test, test, test some more, and when you’re ready to start taking real money from real customers, then start your FoxyCart subscription. We know that sometimes it can take months to get a site going, so we don’t restrict our trial period to 30 days like most other options.
For more information, please visit the payment gateways section of the wiki.
Select the checkbox for “Let customers pay with a Credit or Debit Card”. You can select any bank payment method and fill credentials for a test account. If not, select the “Authorize.net” (or any other) gateway and select the option of “use default test account”.
That’s it. Click the “update payment gateway” button and your payment gateway is configured.
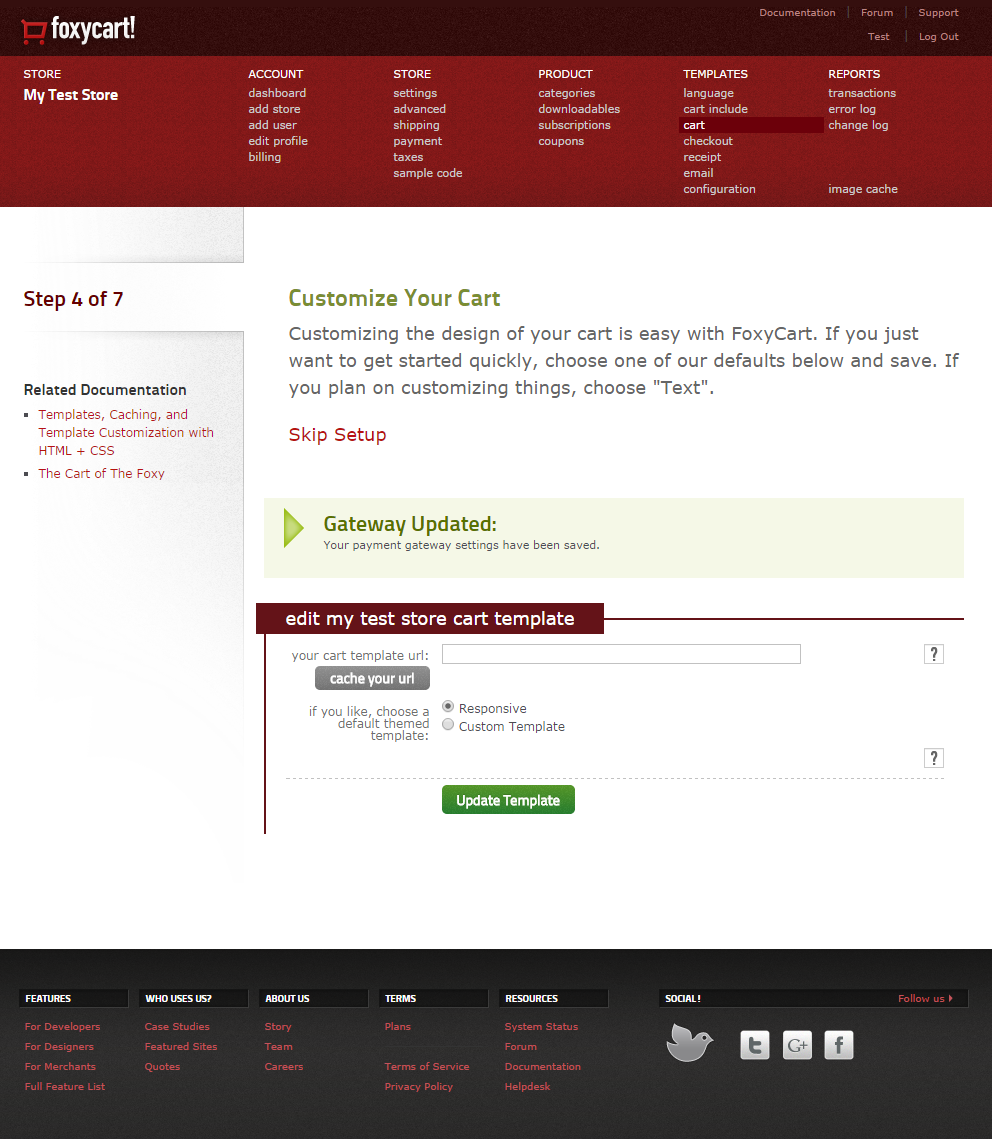
Step 4 - Customize Your Cart
You are almost done. Lets select some default styling for your cart now. Customizing the design of your cart is easy with FoxyCart. If you just want to get started quickly, choose “Responsive” for default responsive themed template below and click “update template”. If you plan on customizing things, choose “Custom Template”. See Template Overview section for more details.
Step 5 - Customize Your Checkout
Just like the cart, you can customize your checkout. Take a brief look at Templates Overview.
If you want to use FoxyCart default responsive template, just select “Responsive” as as default template and click “update template” button.
Step 6 - Customize Your Receipt
Just like the cart and checkout, you can customize your receipt.
If you want to use FoxyCart default responsive template, just select “Responsive” as as default template and click “update template” button. Foxy!
Step 7 - Almost Done! Customize Your Email
You can create a custom receipt email, or you can use one of our defaults (which actually look quite nice). You don't have to set up a receipt email, but you probably want to. Make sure you include a subject as well.
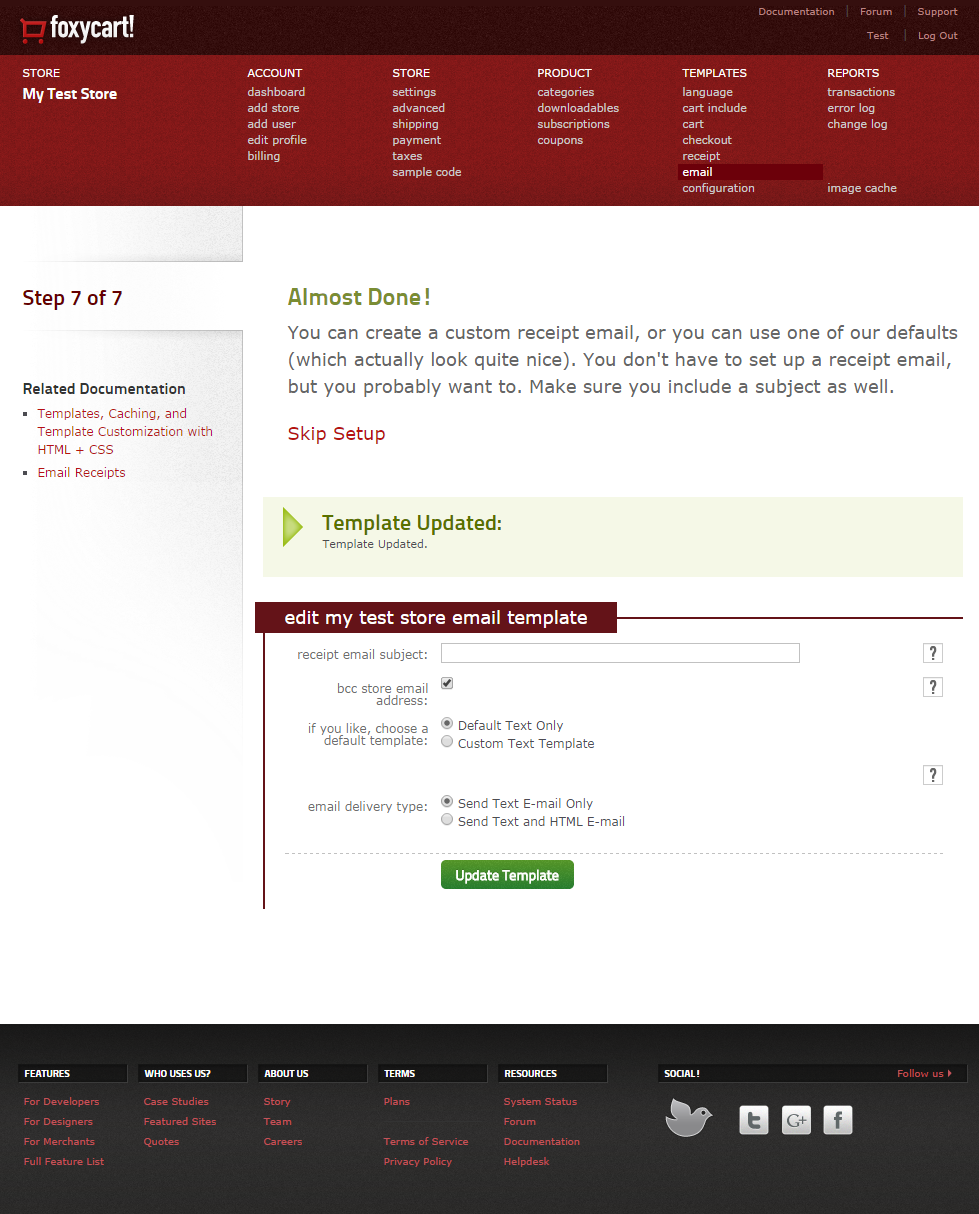
- One quick note: We strongly recommend checking the box to include an HTML email receipt, as most email clients can handle HTML emails now, and they look a lot better than the plain text emails.
- receipt email subject: This will be the subject of your receipt email. Note: To turn off receipt emails, leave this field blank and receipt emails will not be sent. You can also use the following place holders ^^order_id^^ and ^^store_name^^.
- bcc store email address: If you'd like to receive a copy of all receipts sent to your customers, check this box and each receipt will be blind carbon copied to the address you set up in your store settings.
- receipt text email template: Valid place holders include: ^^store_name^^, ^^store_logo^^, ^^receipt^^ and ^^cart^^ (see a complete list of available place holders).
- if you like, choose a default template: Use these templates as a quick and easy way to get started, or as a starting point to develop your own template and CSS.
- email delivery type: Send text e-mail only or send text and HTML e-mail.
You can fill the optional fields or just select “Send Text and HTML E-mail” as default template and click “update template”.
Done! Next up - Integrate FoxyCart into your site!
(woot!) You are done with the basic configurations of your store !
You can now get your website's store set up to work with FoxyCart.